The interior of our ’80 C10 had definitely seen its fair share of abuse through the years. Though decidedly dirty, it wasn’t so much trashed as it was just suffering from the damages of sun and fun. Luckily, the damage was limited to the items that are easily replaced, door panels, dash pad, seat cover, etc., while the paint and sheetmetal inside the truck was in very good condition. That prompted our “backwards” thinking when it came to tackling the interior first.
Upholstery isn’t usually among the first items to be tackled when it comes to building a classic truck. In fact, it’s usually the last. But this time ‘round, timelines and such are a little different. What started out as a simple interior cleanup turned into a complete dash overhaul in preparation for sending the truck to TMI Products for a completely custom interior. Larry Ashley at TMI recommended restoring the dash with a new black dash pad, that way we could pick and choose fabric and interior materials without having to match an aftermarket pad color. This turned out to be great advice as the colors and material we picked for the interior were not what we originally intended. But that’s for another story to come…
As it turned out, restoring the dash turned into a bigger project than I imagined as it meant installing most of the Vintage Air SureFit A/C kit, new gauges from Dakota Digital, a Custom Autosound radio, plenty of Dynamat, an Eddie Motorsports steering wheel, and a laundry list of reproduction parts from LMC Truck. But doing so got us to the point where the boys at TMI could do their thing, confident that we won’t have to go trampling around their handiwork, and, once painted, all that will be left to finish off the cab will be the glass appointments.
Though it is a bit backwards, at the end of the day, it allows us to keep the ball rolling while waiting for various components to show up and doesn’t infringe on anything that will need to be done later in the build process. It’s all about careful planning and decent execution; who’s to say we don’t learn new things?! So while we wait to swap the truck onto the new LT1-powered Roadster Shop SPEC-Series chassis, why don’t we clean up the interior appointments? CC
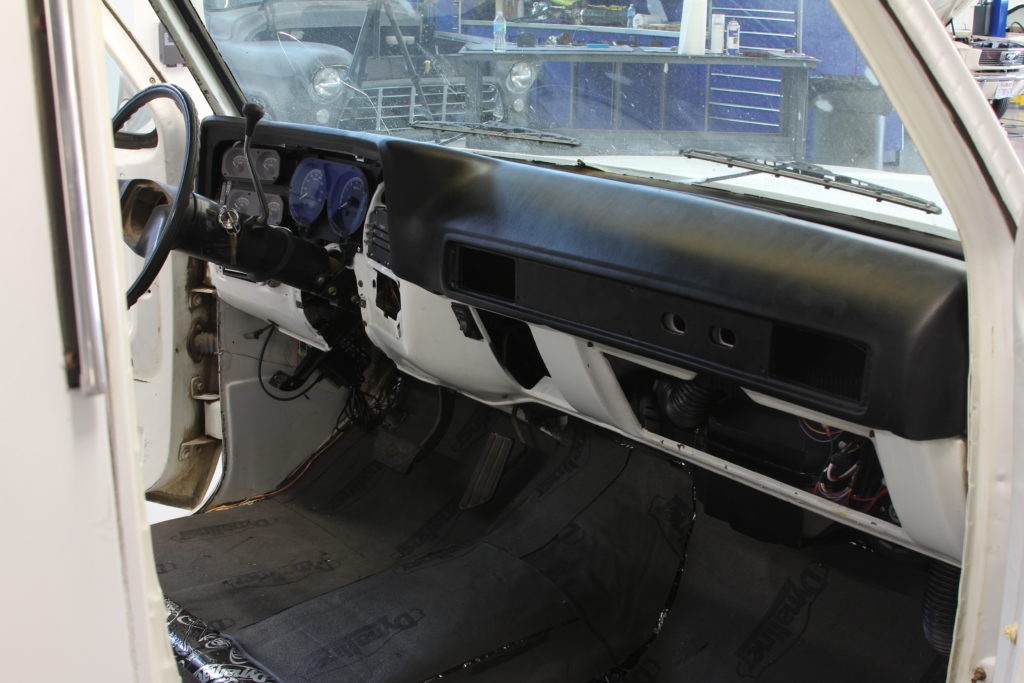
The first step towards a proper rehab job is to completely gut the interior. A very involved cleaning was then necessary before any progress could be made as the interior of the C10 looked like it’d been parked in the desert with the windows down for a decade. Once everything was nice and clean, a layer of Dynamat Xtreme was laid down from the top of the firewall to the rear belt line of the cab. Since the dash is relatively large, it received some Dynamat as well in certain locations. Once the door panels were removed, we installed a sheet or two in there as well. The result is a solid cab that will remain comfortable whether the A/C is cranked or the heater is on.
Rebuilding the dash will consist of a number of new products, some that will be installed completely and some that will be installed to a certain extent and then finished once the chassis is swapped and the new drivetrain installed. One of the components that will be installed completely is the Dakota Digital VHX Series Black Alloy gauge cluster. Packed with micro-controlled precision stepper motors, solid state sensors for unparalleled accuracy, and user-customizable display feedback, the VHX cluster will give our C10 that modern look with performance to boot. The two LCD message centers are essential to initial and can be arranged to display a variety of information as well.
Hooking up the VHX gauges is about as simple as it gets since Dakota Digital removes the guesswork by providing the proper senders that are installed and then wired to the proper terminal on their Control Box. We’ll be connecting our gauges using this method for now, but when it comes time to rewire the truck with the LT1 engine installed, we’ll be using Dakota Digital’s optional BIM-01-2 interface (shown here attached to the Control Box) that will enable us to tap into the LT1’s ECU to extract the same information from the ECU’s OBD-II port.
In addition to the new gauge cluster, we’ll also be replacing the stock dash bezel as well using LMC Truck #38-8093.
Before the cluster or bezel is installed in the dash, the two are attached on the bench so that they can be aligned perfectly. Dakota Digital incorporates these unique mounting features that allow the end user to adjust the alignment between the cluster and the bezel before installation.
Two different turn signal indicator locations are offered on the VHX Series gauges, either in the stock location (white wire harnesses) or incorporated in the speedo gauge. The larger black CAT5 cable sends and receives all the information necessary between the VHX gauge cluster and Control Box, making for a simple installation.
The cluster is then installed in the dash and the necessary electrical connections made.
While we have the dash apart, it only made sense to install the cab portion of our Vintage Air SureFit kit. This will make for an easy installation of the remaining components once the chassis swap is complete.
The first task to tackle is to remove all the stock A/C or heater system components from the engine compartment. Since our ’80 was an A/C truck, this meant removing the old evaporator, blower housing, drier, and related lines, hoses, and wiring.
Once the original components are out of the way, the new Vintage Air parts can be installed. First on the list is this Fresh Air Cap. A bead of silicone is applied to the back side of the cap before it’s fastened in place. Note that we’ve removed the inner fender for increased access.
The Firewall Cover is installed next, using a handful of existing holes to fasten it in place while the rest are marked and drilled.
Three 1 1/8-inch holes and two 2-inch holes also need to be located, marked, and drilled to allow the wiring harness, evaporator and heater hard lines to pass through the firewall. The Firewall Cover is then reinstalled along with the provided grommets for the respective holes.
Back inside the cab, the factory fresh air door assembly needs to be removed from the kick panel and covered.
This is accomplished using the provided block off plate.
These defrost vents are part of Vintage Air’s kit and simply drop in place at the top of the dash. These are held in place by the dash pad we’ll be installing a little later.
To mount the evaporator to the firewall, these brackets are provided by Vintage Air and attach to the evaporator before it’s lifted into place behind the dash.
These hard lines also need to be installed on the evaporator before it’s bolted in place. From the top is the #10 suction line, heater lines, and the #6 liquid line.
The hard line connections use an O-ring design for sealing purposes. Lubricating each O-ring before installation is paramount to preventing ripped O-rings and leaks in the system.
With all the components in place, the evaporator can be installed behind the dash. Fitting the case between the firewall and dash can be a tight squeeze and may require the center dash support to be removed as well as the right hand dash mounting bolts. We found this to help as well as removing the glovebox and door as well as the ashtray assembly. Before everything is snugged up, the bottom of the evaporator case is checked for level, both side to side and fore and aft, to ensure propper drainage of the unit.
Next, the drainage hose is installed, passing through the firewall via a 5/8-inch hole drilled 1-inch lower that the drainage elbow in the evaporator case.
To prevent the #10 suction line from condensing inside the cab, the exposed metal (fitting and hard line) need to be wrapped with the supplied press tape.
The heater control valve is installed on the lower heater hose between the engine and the evaporator. This controls the flow of coolant through the heater core, preventing unwanted hot coolant from entering the evaporator when not required (when the A/C is on, for example).
Back inside the engine compartment and the #10 and #6 A/C lines are visible at left, as are the heater hoses (inlet at bottom with heater control valve attached and the return to the intake at top) as well as the drain line at lower right.
The evaporator case requires modifying the stock glovebox to suit using the provided template and new glovebox that clips into place.
Before we install the A/C vents, we need to install the new dash pad from LMC Truck. This simply snaps in place on top of the dash and then is fastened along the lower edge with a handful of screws and anchor nuts, so don’t forget to order the necessary clips and hardware (#30-0569, #30-1111, and #30-0594).
Our stock A/C vents were damaged and pretty beat up so we opted to replace them with parts from LMC Truck. From left is part #38-5250 (left hand vent assembly), #38-5264 (center, right hand vent), #38-5254 (dash vent adaptor), #38-5258 (center, right hand vent assembly), #38-5260 (right hand vent assembly).
The two center vent assemblies require these provided adapters to attach the vent to the ducting…
…while the right hand assembly requires a different style adapter.
The left hand vent assembly attaches directly to the dash…
…while the center, left hand assembly attaches to the dash bezel.
The center, right hand and far right hand vent assemblies attach to the dash pad, once installed.
The new Vintage Air control panel is bolted up in the stock location. The fully electronic servo motor controls and “fly-by-wire” panel means no cables to install, making for an easy and clean installation. With all the components installed, the ducting is installed and the wiring harness attached to the necessary termination points and the cab portion of our Vintage Air climate control system is complete.
One more creature comfort for our Squarebody are these 3-point retractable seat belts (#38-2246-BL) from LMC Truck. One of the benefits of building a later model truck is the fact that they came equipped with safety features such as 3-point harness attachment points stock.
When we originally purchased our truck, the tape deck that was in place, likely since the ‘80s, sounded like it was stuck perpetually playing whatever Great White tape was lodged within. Suffice to say, it came out, and in its place went a USA-630 radio from Classic Autosound. Its OEM look belies the fact that it contains such modern capabilities as iPod doc and navigation, direct USB input for playback of MP3/WMA song files, optional Bluetooth streaming, and additional inputs for satellite radio and CD changer. The more than capable 300 watts of power can be multiplied many times over by connecting additional amplifiers via its four pre-out jacks. And if AM radio is more your speed, you can pick up all your favorite ball games as the USA-630 doesn’t overlook the traditional AM-FM stereo capabilities.
In place, the Classic Autosound USA-630 looks like part and performs even better, a perfect modern upgrade for our contemporary build.
With our cab upgrades complete, an Eddie Motorsports Racer 3-spoke steering wheel (#MS140-50BK) tops off the overhaul and really adds to the modern vibe that our truck will reflect as the build progresses.